426 Hemi Intake Manifold Torque Specs
The Hemi intake manifold installation and torque specs can be a confusing topic. It’s due to the different screws and studs why people ask many questions. Let’s take a close look at the 426 Hemi Intake Manifold torque specs.
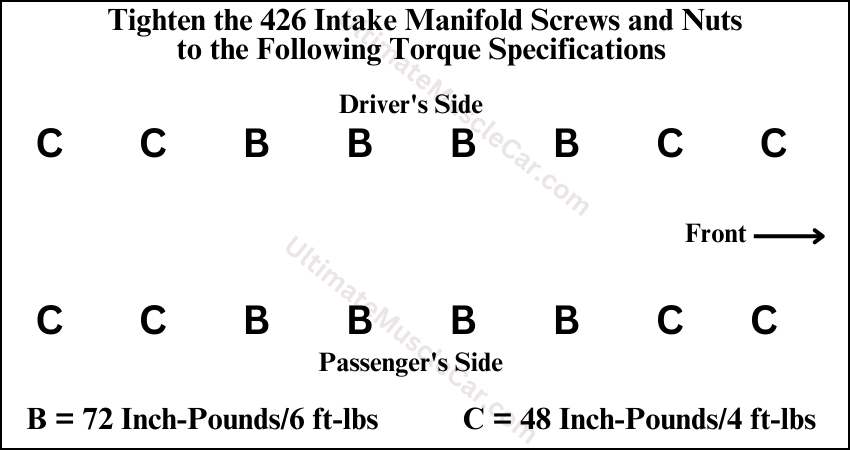
The 426 Hemi intake manifold has two different torque specifications. The middle eight screws and nuts are torqued down to 72 inch-pounds. The remaining eight front and rear screws and nuts are torqued to 48 inch-pounds.
This article will explain in detail the exact torque sequence of all the fasteners and in how many steps. In addition, I’ll explain where the different length screws and studs should be located.
426 Hemi Intake Manifold Torque Specs
The 426 Hemi intake manifold is one of the most difficult to correctly install and achieve a proper seal.
The Chrysler service manual doesn’t go into much detail about how to accomplish this task. It is typically easy on most other engines.
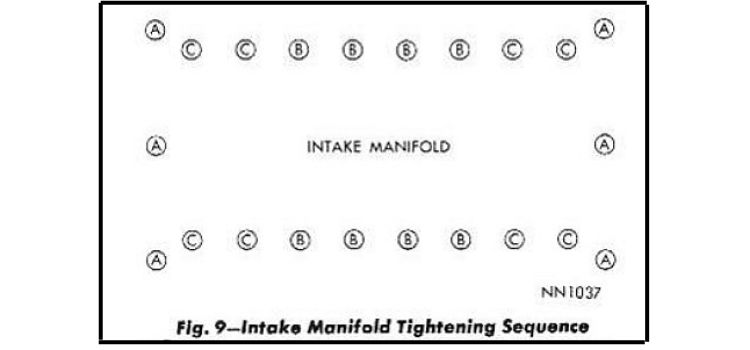
The service manual doesn’t give an exact bolt or nut sequence, just by area starting in the middle.
The following image below shows the service manual photo of the intake manifold tightening sequence.
The following is the service manual instructions on how to install the intake manifold, the torque specs and instructions:
“Install new intake manifold gaskets and intake manifold; make sure end gaskets are positioned over locating dowels marked “A” in figure 9. Tighten screws marked “B” to 72 inch-pounds, and screws marked “C” to 48 inch-pounds. Repeat the tightening procedure in the sequence shown until all screws maintain their specified torque.”
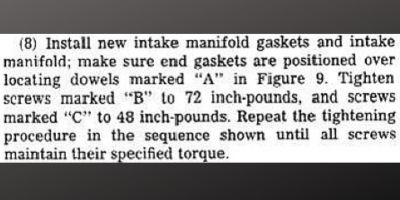
It’s important to note 1966 Hemi engines had screws (bolts) in position “A” shown above instead of dowels. The torque for those six screws is 48 inch-pounds as per the 1966 engine service manual.
An early 1966 intake manifold will have an access hole in the rear to tighten or loosen the center rear screw.
Check out my article, 426 Hemi Intake Manifold Type and Identification. The article dives into extreme detail about the access hole and other important facts about the manifolds for each year.
Hemi Intake Manifold Installation and Torque: Step by Step Directions
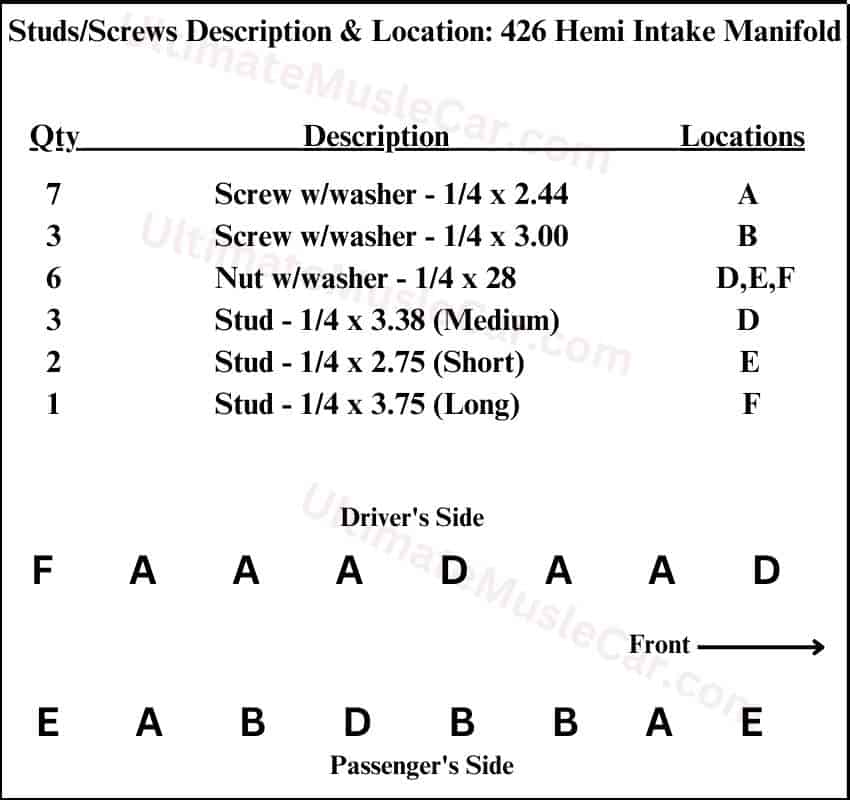
The following is a step by step guide on how to properly torque down the screws and nuts on the 426 Hemi intake manifold. Please refer to the images/figures below.
- Install the 6 studs in the locations indicted in figure #1 below. Use a non-permanent chemical thread locking compound like Loctite Blue. Allow the thread locker to dry as per the manufacturer.
- Apply the adhesive, seals and gaskets as per the manufacturer. The studs should help hold the gaskets in place.
- Carefully place the intake manifold on the engine assembly.
- Install the screws as indicated in figure #1 below. *Be sure to install any throttle, lockdown linkage and/or return spring brackets along with the screws.
- Install the nuts on the 6 studs.
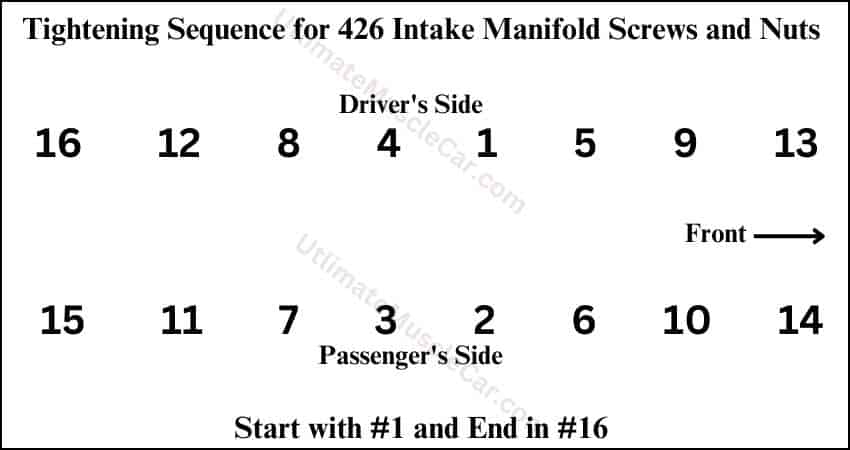
- Start torquing the screws and the nuts in the sequence indicated in figure #2 below. *Torque each screw and nut to 24 inch-pounds.
- Then torque each screw and nut to 48 inch-pounds following the sequence.
- Then torque each screw and nut in the “B” locations to 60 inch-pounds.
- Then re-torque each screw and nut in the “C” locations to 48 inch-pounds again. *It is very important to continue re-torquing the “C” locations to 48 inch-pounds every time you torque the “B” locations.
- Then torque each screw and nut in the “B” locations to 72 inch-pounds.
- Then re-torque each screw and nut in the “C” locations to 48 inch-pounds again.
- Then re-torque each screw and nut in the “B” locations to 72 inch-pounds and the “C” locations to 48 inch-pounds.
- Keep repeating step #12 following the sequence until all 16 screws and nuts retain their torque.
- Wait one hour and then re-torque all 16 screws and nuts in the proper sequence and inch-pounds until they retain their torque.
- It may take up to 20 or more torque sequences until the screws and nuts retain their torque.
- Do not over tighten the screws and nuts to shorten the process.
Why does the Hemi intake manifold require so many torque sequences?
Every torque sequence draws the intake manifold down into the valley a little more. When this occurs, the torque stress gets removed from some of the screws or nuts. The intake manifold must be pulled down gradually until the gaskets and seals are fully compressed.
- It’s extremely important to take your time and be patient with this process.
- Over tightening the screws or nuts may result in a cracked cylinder head, intake manifold or broken bolt.
- Make sure you do not mistake inch-pounds for foot-pounds.
- 24 inch-pounds = 2 ft-lbs
- 48 inch-pounds = 4 ft-lbs
- 72 inch-pounds = 6 ft-lbs
A few months ago I helped a friend torque a Hemi intake manifold. It required 13 sequences until they retained their torque. I know it can be a tedious and frustrating experience.
The Proper Screw and Stud Locations: Avoid Installation Issues
Tightening Sequence/Order
Torque Specifications in Inch-pounds and Foot-pounds for Intake Manifold Bolts
Intake Manifold Screws/Bolts
In 1966 and 1967 the intake manifold used the rounded Allen head screws. For 1968-1971 the manifold used the hexagon head screws.
The torque specifications and sequences were the same for all the screws and years.
There is no reason to increase the grade specs or head grade more than the Mopar factory issued.
If you’re interested in all of the engine block and part specs check out my article, 426 Hemi Specifications.
If you have any questions or if you have more information you’d like to contribute, send us an email found on our contact page.
Check out other Mopar engine intake manifold torque articles:
I learned about the Hemi intake manifold specs by reading Mopar books, articles, magazines, seminars and watching videos for approximately 40 years. I installed an intake manifold just a few weeks prior to writing this article.
Read More Articles!
426 Hemi Head Torque Sequence and Specs
Can You Put Hemi Type Heads on a 440?
426 Hemi Miles Per Gallon: Each Year and Model
Article Resources
- Google books: How to Rebuild and Modify Chrysler Hemi Engines
- Google Books: Hemi
- Google Books: Chrysler Engines 1922-1998
- Mopar Service Manuals from 1966-1971
