426 Hemi Head Torque Sequence and Torque Specifications
The 426 Hemi head torque sequence and torque specs for the cylinder head bolts and nuts is a question often asked.
A factory 426 Hemi head cylinder bolts and nuts are torqued to 75 foot-pounds. The head bolts and stud nuts are torqued in two steps, first 50 ft. lbs. then 75 ft. lbs., while following the torque sequence.
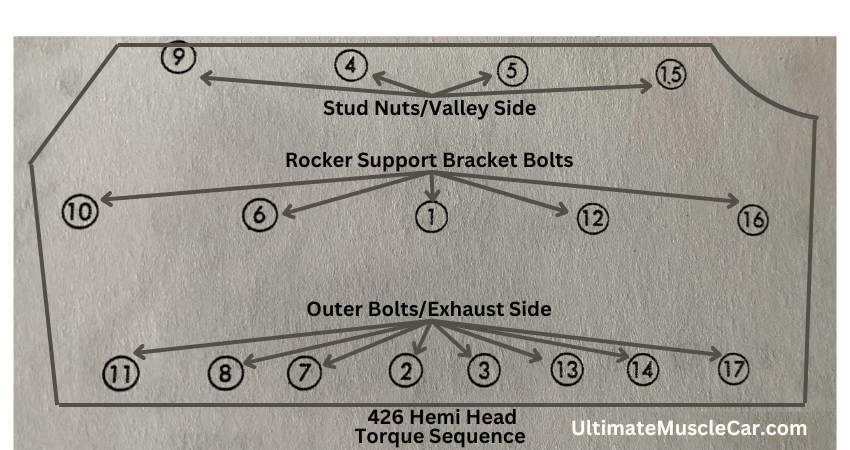
The following diagram is the torque sequence of the 13 bolts and 4 stud nuts. The torque sequence starts in the middle of the head and then towards the ends.
The sequence is the same for cast iron or aluminum heads.

426 Hemi Head Torque Sequence and Torque Specifications
The following step-by-step instructions are from the Chrysler engine manual and used for cast iron heads.
Once the cylinder head is placed onto the block, follow these steps:
- Install the cylinder head stud nuts inside of the lifter valley and the eight short outer cylinder heads bolts. Do not tighten them at this time.
- Install the push rods through the push rod holes in the head. The short rods in the upper holes (intake) and the long rods in the lower holes (exhaust).
- Position the assembled rocker shafts and support brackets on the cylinder head.
- Install the five long cylinder head bolts into the rocker shaft support brackets and cylinder head.
- Line up all the pushrods to their respective rocker arms.
- Starting at the center (#1 in the torque sequence) tighten all the head bolts and stud nuts to 50 foot-pounds in sequence.
- Restart the sequence starting at the center, tightening all the head bolts and stud nuts to 75 foot-pounds.
Some people prefer using a three step torque sequence, IE: 25-50-75 ft. lbs. I prefer to use three steps and take a short break between each step.
Some people prefer using less torque for the stud nuts. They claim the heads may stress due to the location and angle of the studs. I’ve known many people who have success either way. If using factory heads, I prefer to use the factory specifications.
Torquing the Stud Nuts
Most torque wrenches and sockets will not fit onto the lower stud nuts. The engine block valley gets in the way not providing enough clearance.
Most people use a torque adapter (aka crow’s foot). They are about 2″ long. One end attaches to the torque wrench, and the other end resembles a box wrench fitting onto the nut.
I’ve seen some people use a 3/8″ torque wrench with a short socket eliminating the need for an adapter. The 3/8″ drive typically adjusts up to 75 foot-pounds. This is my preferred method.
The problem with using an adapter is it changes the leverage of the wrench increasing the torque of the bolt. Therefore, if you set the adjustment at 75 ft. lbs., the nut will actually be tightened more than 75.
A formula must be used to adjust the torque used on the nuts.
Torque Wrench Adapter Formula
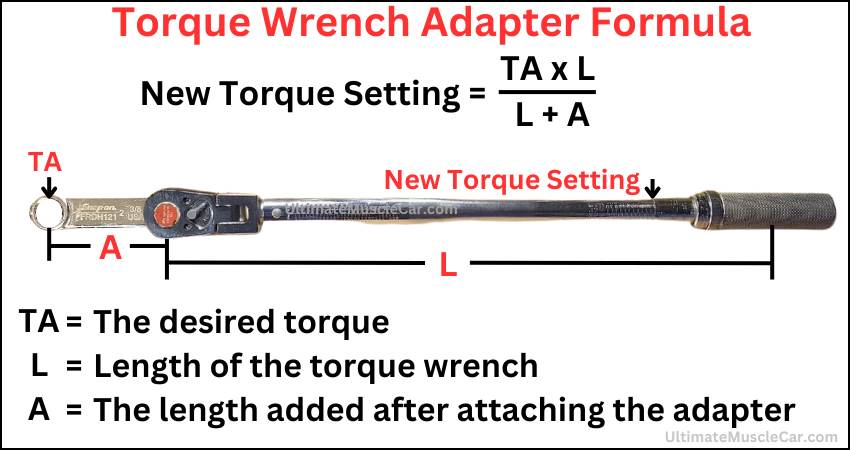
The torque wrench adapter formula:
TA x L / L + A = New torque setting
- TA= The desired torque
- L= The length of the torque wrench (From the center of the handle to the center of the square drive).
- A= The length added after attaching the adaptor. (From the center of the square drive to the center wrench drive/opening).
- New torque setting (This will be lower than the desired torque).
Let’s run this formula through an example. In this example:
- I wish to torque the stud nuts to 75 ft. lbs (TA).
- I’m using a Snap-on torque wrench measuring 20 inches from the center of the handle to the center of the square drive (L).
- The adapter is 2″ long (A).
Let’s apply the formula:
- 75 (TA) x 20 (L)=1,500
- 1,500/20 (L) + 2 (A)
- 1,500/22=68.18 (New torque setting)
Therefore, I would have to set the torque wrench at 68.18 to achieve my desired torque of 75 foot-pounds.

You would have to figure the length of your torque wrench, adapter and apply your desired torque.
It’s useful to setup two torque wrenches for the job. Set one for the stud nuts and the other for the bolts.
Since the wrenches are expensive, try borrowing one from a friend. The cost of a new torque wrench to fit onto the stud nuts is not worth it for most people. This is why the adapter is used in most applications.
If you’re wondering exactly what the casting numbers are on all Hemi heads check out my article, 426 Hemi Head Casting Numbers.
Aluminum Heads: Specs
Mopar Performance recommends torquing the aluminum cylinder head bolts to 65-70 foot-pounds.
The type of aftermarket aluminum heads used can change the torque specifications. Always check with the manufacturer of your particular cylinder head.
Studs or Different Bolt Kits
Using studs or other manufacturer head to block bolt kits on the stock head may change the torque specifications. Always check with the manufacturer.
For example, ARP studs may require 80 foot-pounds done in three steps.
Your next step may be torquing the intake manifold down. It’s not easy, check out my article, 426 Hemi Intake Manifold Torque Specs.
If you have any questions, cylinder head torque or more information you’d like to contribute, send us an email found specifically on our contact page.
Check out more cylinder head torque sequence articles:
For the past 40 years, I’ve been studying and researching Mopar engines and cylinder heads like the 426 Hemi. I’ve assembled, disassembled and torqued its cylinder heads, read books, articles, magazines, watched videos, attended seminars and spoken to other Mopar experts.
More Mopar Engine Articles!
Can You Put Hemi Heads on a 440?
Article Resources
- Google Books: Chrysler Engines 1922-1998
- Google books: How to Rebuild and Modify Chrysler 426 Hemi Engines
- Chrysler Engine Service Manual
- Wikipedia: Chrysler Hemi engine
